 Guest Post by Rob from Chainsaw Guitar Tuition
There are many guitar players and teachers out there who would happily tell you that all you need for a great blues solo is about three notes. Now, while this is probably true, you have to really know what to do with those notes for that to work!
I mean, if you cut down on one thing, you probably need to add something else, right? Well, there is plenty of things you can do with very few notes, if you pay attention to the subtleties!
These are the things that will take your solo from ‘good’ to ‘great’ (or maybe even ‘magical’…). Let me show you some of my favourites…
The Scale
For almost all of the following moves, we’ll be using the
minor blues scale. If you’re a blues player already, you’ll probably know this scale, but how well do you know the construction? I mean, the ins-and-outs of how the scale is made up?
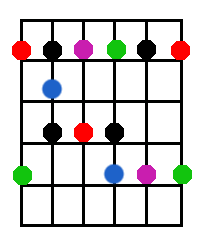
Throughout this article, I’m going to be referring to certain notes within the scale. I’ve marked these on the diagram.
For simplicity, I’m going to relate everything to the first shape of the blues scale, but you should apply this to all five shapes.
The notes that I’ve marked are:
- The root (red)
- The minor third (green)
- The ‘blues’ note (blue)
- The minor 7th (purple)
Matt Scofield Shows All the Moves in Action
So, if you don’t already know where those notes are, I suggest you get familiar with their positions. For now, you can just keep referring back to the above diagram as a reference.
Also, I’m assuming that most of these licks are being played over a static chord. Otherwise the relationships between the chords and the scale become more confusing!
Feel free to take these ideas and transpose them to fit more chords.
1. Minor Third Bend
One of my favourite ways to add that instant bluesy feel into anything is to bend the third (I mean, seriously, you can do this in any style to add a bit of blues!). The concept if fairly straightforward, but in order to do it right there are a few things to take note of.
The basic idea behind this is to take a minor third (any one marked in the diagram above), and bend it up by one fret. This will take you to the major third.
Here is an example lick using this technique:
Now, this is where you’ll have to be careful! If you use, say, the A minor blues scale over an A minor chord (https://www.basicmusictheory.com/a-minor-triad-chords), this technique WILL PROBABLY NOT WORK.
Because we’re changing the minor third for a major third, you have to use this idea over a major chord for it to work best. That is, a major chord with the same root not as your scale.
Having said that, this is the blues, and you should rely on your ear for what works and doesn’t!
2. Bending The 7th To The Root
This next move follows a similar idea, but this time you’re bending the 7th note up two frets to the root. The good news? This will work over either a major or minor chord, as the target note is the root note of the chord.
Here is an example of this technique in action:
Just make sure you bend up by two frets, and don’t stop short or over-shoot! Again, use your ears to judge where it best fits the chord underneath.
3. The “Blues” Passing Note
Here’s a move that can either sound gritty and mean, or a bit twee and cliché. It all depends on how you do it!
What I’m talking about is using the flat fifth (aka ‘blues note’) as a passing note. That is: a note to pass through, and not to dwell on. Unless you’re playing in a Black Sabbath tribute band (or similar) actually targeting this note is probably a very bad idea.
Instead, here are some ideas in which you ‘pass through’ the note. This creates a great blues sound without too much dissonance.
For example, here I’m bending the G string up one fret to hit the blues note, then I’m returning it back, before ending the lick on the root:
If you do this kind of thing right, you can add just a touch of grit and passion to the lick. You’re not going all-out with ‘outside’ notes, but you still get some dissonance.
Another great way to use this note is to play up or down the scale, passing through the note. Here are some examples:
4. Hitting The Root At The End of The Scale
The root note of any chord is absolutely the safest note to play over it in a solo. That’s true no matter what chord it is, or what key you’re in.
So, if you’re stuck on how to end a lick, or you feel completely lost, you can just jump to the root note and end the phrase there. If you really were lost, it wont matter because it’ll sound like you meant that to happen.
Of course, you can also use this idea with a lick that you’ve PLANNED! The example below starts with the third bend from earlier, and then jumps to the root note:
Because of the third bend, this lick works best over major chords. If you wanted to do a similar thing over a minor chord, then you would need an unbent minor third:
5. Sliding To The Third
The root note may be the ‘safest’ note to pick, but it’s not the only option! Over a major chord, it can also sound great to end a lick with the major third.
The major third is what we were bending to earlier, and it lives one fret above (higher in pitch) than the minor third. So, you might try something like this:
…or this, which combines this idea with our third bend from earlier:
Using the MAJOR third like this, means that this particular move works best over major chords, or where you’ve got the bass just playing a steady root note.
6. Using The Call and Response Technique
The idea of ‘call and response’ (also called ‘question and answer’) has been used in blues music since the very beginning! Although, this isn’t just a blues technique, it’s used in almost every style of music- even Classical (where it is known as ‘antecedent and consequent phrases’).
So, what is it? This is where you play one phrase, or lick as a question. Then you play a ‘follow-up’ lick as the answer to this question.
Obviously, these two phrases have to be linked in some way. Just playing two consecutive phrases does not equal ‘call and response’! Instead, give your first phrase a ‘question intonation’, and make the second sound like an answer.
Question intonation is where you raise the pitch at the end of a question. Then, the answer would generally bring this back down.
Here are some examples of this type of phrasing in action:
7. Switching From Major To Minor
Here’s something that tends to confuse my students all the time! Something almost specific to the blues is that it doesn’t have to always be in a major or minor key. It can just be ‘in the key of blues’.
This means that you can have a blues progression that is entirely made up of dominant 7th chords. This doesn’t technically fit with any key, it’s just ‘blues’- meaning that you can use either the major, or minor blues scales when soloing over it.
A great trick here is to switch from one scale to the other. It works even better if you set it up as a question and answer type phrase, but you can just change it up at almost any point.
So, in order to take our minor blues scale and make it major, you can do one of two things:
- Move everything down by three frets
- Stay in the same position, but switch to the next scale shape up
The first one is probably the easiest, although both have exactly the same effect. For example, if you play a lick using the minor blues scale, move that same like down three frets and you’ll be in the major blues scale:
The problem with doing this is that you’re now in a different key- meaning all the positions of the notes (root, minor third etc) from before goes out the window.
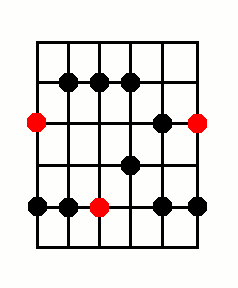
The second method is to just change the scale shape, but stay in the same place. For this you’ll be using the second shape of the minor blues scale. Just make sure you have the root notes in the same position as before!
8. Going Modal
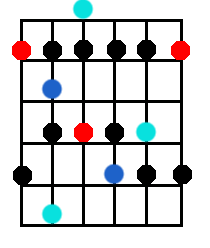
Well, avoiding the whole debate on what a mode is or isn’t, what I’m talking about here is bringing in the ‘flavour’ of the dorian mode. All you need for this is the major sixth added to the scale.
Here is the blues scale with the major sixth added:
This allows you to slide into it, like this:
So, maybe you’re not fully using the modes, but you can give that impression. This is a great way to liven up the old standard blues (or pentatonic) scale- just don’t overdo it!
9. Sixth Intervals
Moving away from the blues scale for a second, sixth intervals can also sound very bluesy on their own.
What are they? Well, an ‘interval’ is the distance in pitch between two notes. These aren’t quite chords, because they’re only two notes, they are intervals.
Now, if you play a note on the D string, and also play the same fret on the B string, you create a MAJOR 6th interval. Move the note on the B string down by a fret gives you a MINOR 6th interval.
If we put these together, we can play the natural minor scale up and down the neck in 6ths. Here is an example with the A minor scale:
Now, try adding some of these notes to your bluesy solos. You don’t have to play both notes at the same time.
10. The Rake
OK, now for what is probably my absolute favourite of all the ‘blues moves’: the rake.
What is it? Well, you literally just rake your pick across the strings, until you get to your note. Use a finger from your fretting hand to lay across the strings and mute them, up until the string you want.
This is especially effective when combined with a bend!
This is probably more of a technique for electric guitar, rather than acoustic…but there are no rules here!
So, there you have it. These are just ten ways you can use to bring your solos from just ‘good’ to ‘great!’. There are probably thousands more, these are just my ten favourite.


